Growing Clivia in Cold Climates
Cleaning Seeds
This is aimed at Clivia lovers in colder climates. While these plants can be grown outdoors in the ground as landscape perennials in parts of Florida and California, residents of most of the rest of the USA have to treat them as container plants.
The fruit of the clivia plant is a berry. When ripe, the skin is soft; and there is a fleshy layer under the skin that covers the seeds. The fleshy layer is usually about 1 to 3 mm (ca. 1/16 to 1/8 inch) thick.
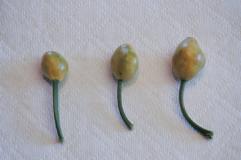
 Dave Conway says you can harvest clivia berries any time after about their fifth month and still have them germinate. I try to wait at least until the berries start to turn color. Some plants will not ripen their fruits completely until a full 12 or 13 months. I wait until the outer hull of the berry begins to soften and you can feel the individual seeds within through the skin. These are berries of 'Vico Yellow', a group I yellow, and are not red when ripe but yellowish in color.
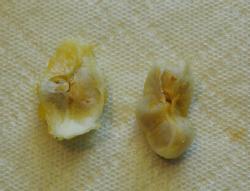
The berries have an outer, fleshy, skin. When you remove this, there will be a second covering, a thinner light skin. It is rougher textured than the outside surface of the berry. The light skin often encloses two or sometimes three seeds. This skin must also be removed.
 Then the seeds themselves should be in view. They are translucent, pale green or yellow in color, and usually have a smooth, shiny surface. They should be washed free of any remaining flesh, juice, or skin fragments. The seeds can be stored in a plastic bag in a refrigerator for several months without completely losing viability.
If you are not sure your Clivia seeds are fresh, it is always wise to start them by soaking them overnight in clean tap water or distilled water. If they are old or shrunken, you should change the water the next morning and soak for another 24 hours.
According to Prof. Gert Venter of South Africa, writing in the [clivia-enthusiast] list on Yahoo Groups, there are just three conditions necessary for successful germination and starting of Clivia seeds:
- An optimum temperature of about 23°C to 25°C (ca. 73°F to 77°F)
- A relatively high humidity. (± 60 - 70 %), and
- Sterile conditions.
Following the statement of Prof. Venter and the practice of several other clivia growers, we suggest that you proceed as follows:
- Sterilize the cleaned and soaked seeds. You can use dilute hydrogen peroxide, dilute hypochlorite bleach, or diluted Physan 20 or Consan 20.
- Dilute 1 part by volume of 3% hydrogen peroxide solution with 2 parts water and mix well, This gives a 1% solution of peroxide.
- Dilute 1 part by volume of ca. 5% sodium hypochorite bleach with 9 parts water and mix well. This gives a 0.5% solution of hypochlorite.
- Dilute Consan 20 or Physan 20 to 100 parts per million (ppm) by adding 3/8-teaspoonful to 1 gallon of water and mixing well.
- Place the seeds on the suface of moistened Perlite, or Vermiculite, or a mixture of the two. Use a pot of sufficient size to hold the seeds. Be sure the pot has drainage holes in the bottom.
- Cover the top of the pot with plastic to hold moisture in and to exclude mold and bacterial spores. Stand the pot in a tray or saucer so that it can be watered from below.
- Place it in a brightly lighted spot but out of any direct sunlight. This spot should be warm.
- Dilute 1 part by volume of ca. 5% sodium hypochorite bleach with 9 parts water and mix well. This gives a 0.5% solution of hypochlorite.
When the seeds have all germninated and grown their first real leaf, they can be transplanted into a well-drained soilless potting mix.
Plant the seeds by pressing very lightly into the surface of a well-drained soilless potting mix. We use Promix and sand and granite chick starter grit (1/8 inch mesh) in a ratio of 2 : 1 : 1 parts by volume. Wet the mix well with water and cover the pot loosely with a sheet of clear plastic, such as Saran® wrap. You can then water from below as the surface of the potting mixture dries out.
Once the seed sprouts, which can come anywhere from 2 weeks to 6 months after planting, the new root shoot will push the seed out of the soil. You can make a new hole for the root with your finger when the shoot is about 1 to 2 inches long. Insert the root into the hole and press or wash the soil gently back into the hole around the root.
Once leaves start growing, remove the loose sheet of plastic and continue growing your seedling in bright indirect light or under fluorescent lights. We prefer fluorescent lights about 6 to 8 inches above the growing leaf tips. At this time, start feeding your plant with a dilute solution of a soluble fertilizer. We like Peters® 20-20-20 with trace elements used at ½ teaspoon per gallon of water applied at every other watering.
STORAGE
Clivia seeds, like most seeds in the Amaryllis Family (Amaryllidaceae) are classified as "recalcitrant" ‐ that is, they refuse to go into a dormant state. Left at room temperature and dry for a long time, they will slowly shrink and either germinate dry or else eventually die. You can store them for a few months by putting the seeds in a sealed plastic bag. A few drops of water added will help retain viability. It is a good idea to only store washed and sterilized seeds this way. Fungus (mold) can slowly grow in a refrigerator. It is inadvisable to freeze clivia seeds; that should kill them quickly.
If your young clivia seedlings seem to get stuck at the two-leaf stage, see our discussion of the possible causes of this condition at StuckClivia.
For more advice on growing your clivias, see on the web at CliviaNet Culture.
For information about pollination of clivia in the wild, see on the web at CliviaNet Pollination.
We wish you good luck with your new Clivia seeds.
Jim Shields